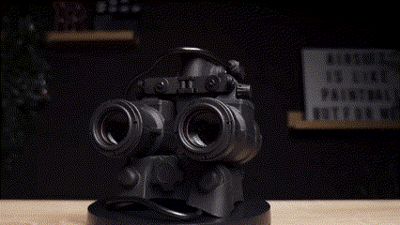
PVS31 Digital NVG GEN.3 - Conversion Kit


Print Profile(5)


Description
Boost Me (for free)
Also don't forget to rate the print profiles and like the project. It's completely free and would me the world to everyone involved in this project.
DVR housing available here.
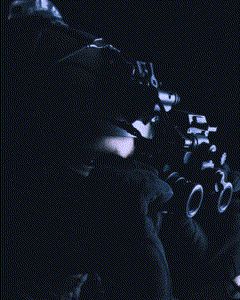
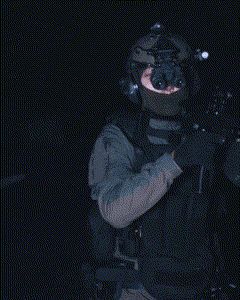
MASTER THE DARKNESS

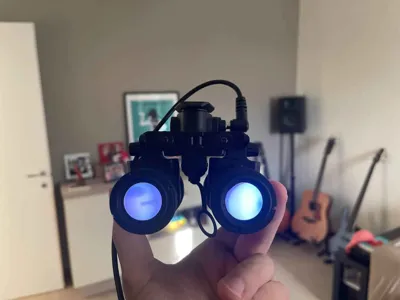
Hello, everyone. My name is Bull, and I'm an Italian airsoft player. Today, I'm here to present you the third iteration of my PVS31 digital conversion kit, a complete assembly to convert the dummy FMA PVS31 into a working one.
I've been working really hard over the past months, along with some incredibly skilled guys who helped me a lot to make this whole thing real and working. The idea that led to this was simple: making night vision accessible to everyone at a more affordable price.
The first two iterations were quite successful even outside Italy, showing that what I thought was a simple idea was instead a needing many people shared around the globe.
So, after hundreds of hours spent into this, I'm finally publishing this for free to all of you!
You can find more showcase videos on my Instagram profile and YouTube Channel.
Also, I've made a video on how to make an IR flashlight for around 10€.
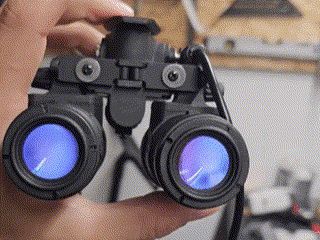
LIST OF MATERIALS
| ITEM | PCS |
|---|---|
| FMA PVS31 Dummy with lighting | 1 |
| Runcam Camera Night Eagle 3 V2 1500TVL | 2 |
| 6mm F0.95 M16 Lense | 2 |
| Step up booster 5V to 9V (Link 1) (Link 2) | 2 |
| Mosfet (Link 1) (Link 2) | 2 |
| Oled Display 0.39" 1024x768 px (You must select "TYPE 4") | 2 |
| Display magnifier18x (You must select “NP18 Inner Core”) | 2 |
| JST Connectors (male and female) | 2+2 |
| Potentiometer switch | 1 |
| Power connector 5x5x2.2mm | 2 |
| Power cable 5.5x2.2mm 90° | 1 |
| AA Batteries contacts | 1 |
| Ni-mh AA 1.2V batteries (2400mAh minimum, IKEA Ladda suggested) | 4 |
| Gauge 28 cables | 1 |
| Instant glue + Nozzle | 1+1 |
OPTIONALS | |
| RunCam DVR | 1 |
| 3.5mm Stereo Jack connector | 1 |
| 3.5mm Jack 90° cable | 1 |
| Rubber caps | 1 |
| Replacement protection glass (You must select “27mm x 2mm”) | 1 |
ASSEMBLY
You'll need to refer to the previous gens for the assembly process and adapt to this.
- GEN.1 assembly (you'll need to start from this)
- GEN.2 upgrade (with DVR for Night Vision video recording)
- GEN.3 upgrade (final step)
Now that you got through the page, you should not forget one last important thing:

Credits:
- Dan from Sixx Precision and Luca for their massive help in realizing the parts.
- maydayalaska for helping me publish the project by making the page and the print profiles.
- Campa Airsoft for posing in the videos and GIFs.
Documentation (1)

License
You shall not share, sub-license, sell, rent, host, transfer, or distribute in any way the digital or 3D printed versions of this object, nor any other derivative work of this object in its digital or physical format (including - but not limited to - remixes of this object, and hosting on other digital platforms). The objects may not be used without permission in any way whatsoever in which you charge money, or collect fees.
Comment & Rating (132)