Mechanical Wave Simulator with Lighthouse & Boat


Print Profile(2)


Bill of Materials


Description
(You can remix or do adaptations on this work as long as you credit back :) )
(Update 1/15/25: The boat model is replaced with a new design instead of 3DBenchy. If you want to use 3DBenchy, please use original 3DBenchy model and scale down to 50% in Bambu Studio, use double side tape to tape onto the wave surface).
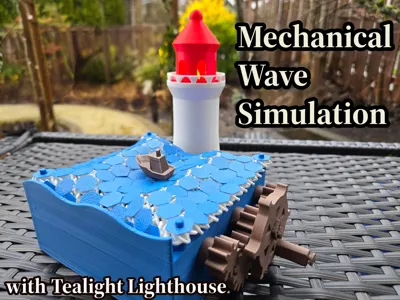
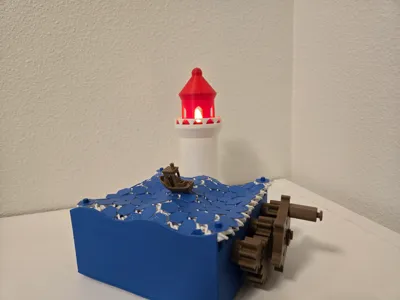
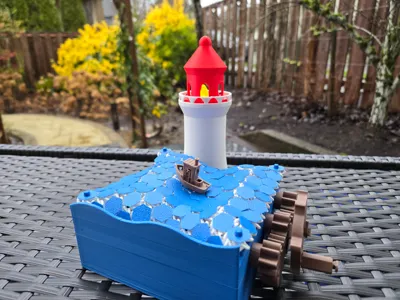
This wave simulation device mechanically simulates sea waves when you rotate the steering wheel! A small boat (benchy) floats up and down with the waves, and a lighthouse in the background serves as an LED tealight holder.

Assembly Instruction:

Step 0:
Insert the four stakes into the corners of the main body box.

Step 1:
Insert two intermediate drive gears into the lower holes on the right side of the wall. Secure the gears in place using the two smaller clips.

Step 2:
Assemble the drive shafts with the helical structures. There are three in total.

Step 3:
Insert the assembled helical structures into the main body box. To facilitate insertion, insert one end first, then the other. Slide the helical structures along the shaft if necessary to make space during insertion. Secure the shaft in place on the left side using the bigger clip.

Step 4:
On the right side, insert the smaller gears onto the shaft. After this step, rotating any of the gears should cause the three helical pieces to rotate in sync. If the rotation is not smooth, adjust the position of the helical structures along the shaft to ensure they rotate freely without touching adjacent structures.

Step 5:
Assemble the steering wheel and handle.

Step 6:
Attach the steering wheel to one of the holes on the smaller gears. Note that support trees may be blocking this hole. Use a knife or pliers to remove the support trees to make the hole visible.

Step 7:
Use double-sided tape to secure the lighthouse in place.

Step 8:
Here are two options. 1) Print a scaled-down 3Dbenchy boat (50% scale) and double tape onto the wave. Or 2) print the boat comes with the print profile and use the stake to secure the boat. The boat comes with a 2mmX4mm hole to insert the stake. Insert the stake from bottom of the fabric, then put the ship on top of the stake.

Step 9:
Put the “wave fabric” onto the main body box. The correct direction of the fabric is shown in the picture.

License
You shall not share, sub-license, sell, rent, host, transfer, or distribute in any way the digital or 3D printed versions of this object, nor any other derivative work of this object in its digital or physical format (including - but not limited to - remixes of this object, and hosting on other digital platforms). The objects may not be used without permission in any way whatsoever in which you charge money, or collect fees.
Comment & Rating (199)