Snowman kit with Gift box and Secrets


Print Profile(2)


Description
Thank You for Downloading the Snowman Kit!
Thank you so much for joining me and downloading this Snowman kit!
To Get the Complete Kit:
You should print the following pieces:
- 1 x Carrot
- 2 x Eyes
- 5 x Pupil Pairs (Flame, Heart, Star, Big, Small)
- 6 x Buttons
- 7 x Mouthpieces
- 18 x Small Pegs
- 4 x Big Pegs
- 1 x Main Box
- 1 x Carrot Box
- 1 x Eye Box
- 1 x Lift for Mouth in Box
- 1 x Lift for Buttons in Box
- 1 x Circle drawer
- 1 x Box drawer
- 1 x Small snowman
- 1 x Lid
- 1 x Text to press into the lid, and it should stick. Can be tight and you might want to print just one letter to make sure it fits in the lid.
Printing Instructions
All pieces are ready to print—drag and drop the STL files into your printer and choose colors you like. Here are my recommendations:
- Black: Pegs, mouthpieces, eyes, and buttons.
- White: Boxes and pupils.
- Carrot: Pick your favorite vibrant color for the final touch!
- Small Snowman: I would go for gold but it is up to you.
- Lid: This is very good to print in red. If the main box is printed in white, the cutouts will show a nice color.
- Letters: I would go for gold or white but use your imagination.
Notes on Printing
- Eye Pieces: The threads on the back may require light support for the top, though most printers should handle it without support.
- Pegs: Ensure strong adhesion or use glue to prevent issues when printing all 16 simultaneously.
- Lid: The text for the lid is “press in place”. It can be hard but press from the outside so it sits. It is used 0.3 mm in difference so you can play around when printing with the scale.
Where do the pieces go?
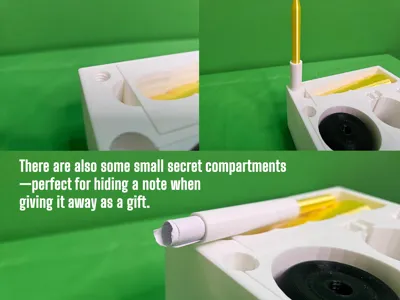
Most of the pieces fit only one place, so it is very easy to put together. Pegs go under the carrot, pupils go under the eye, and the mouth and buttons have their place. Write a secret note and place it in the cylinder drawer, and place the snowman in the little drawer on the side.
How to Use
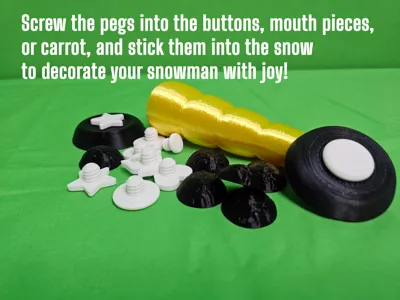
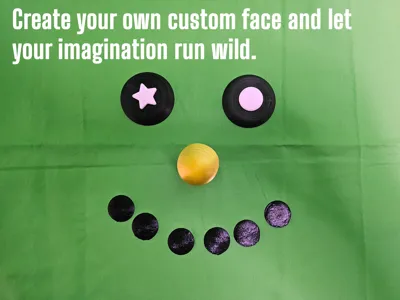
- Choose your favorite piece.
- Screw the peg into the back and attach it to your snowman.
- Decorate the rest of the snowman however you like!
When you're done and the snow melts, gather the pieces so you can use them again—either next year or later the same day!
Sharing the Fun
Once everything is printed, place the pieces in the box, close the lid, and give it to someone else. Watch their creativity grow! I hope they enjoy playing with it as much as I enjoyed designing it. 🎨⛄
Extra
There are also two extra drawers where you can hide something fun. One is for the golden snowman (print out the small snowman in golden color and put it in the drawer at the bottom), and the other is for a little note you can write and place inside. You can only open the “secret” drawer by using the pegs. Screw them in and use it to pull the drawers out. It's just something extra to add a magic touch for the children!
Manuals
It might not be straightforward to use it, so I also created some user manuals. Download a copy, print it out, and put it under the lid when you give away the snowman kit. Hopefully, this will make it easier to get started!
Comment & Rating (8)