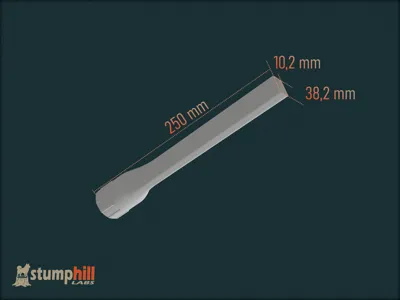
Slim Vacuum Adapter (35mm x 250mm)


Print Profile(3)


Bill of Materials

Description
✨General features:
- Length: 250mm
- 1.6mm wall, prints fast with 0.4mm nozzle → No funky infill movements.
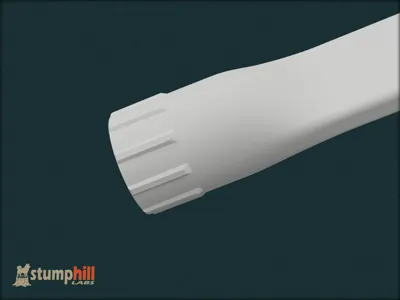
- Grippy base for easy removal
- Compound Nozzle Angle ideal for tight spaces (e.g., car seats)
🕒 Print Time: ~1h 14m (BL P1S)
🧵 Filament: ~46g PETG. (Tested in Sunlu PETG.)
⚙️ Tip: Disable “Slow printing down for better layer cooling” to achieve the advertized print time. This should be preconfigured in the print profile.
Two different models:
- Tight Slim Vacuum Adapter:
- Scale calibration might be required for your specific ∅35mm vacuum hose (and filament). See more details below*.
- ~0.5° taper on the receiving part. If/when you get the right fitment, the part stays on tight!
- Generic Slim Vacuum Adapter:
- Should fit most ∅35mm vacuum hoses straight out of the printer.
- ~2.4° taper on the receiving part. This will fit a wider range of hoses, than the tight fit model.
- NOTE: The calibration rings are likely not compatible with this model, as it has a different taper profile.
For both models, you can see the dimensions of a 100% scale model in the print profiles:
*(Optional) Scale Calibration
As brought up by user @arekxyz , the fitment is very tight and the tolerances are small. Rather than model versions for hundreds of different vacuums, filaments and extrusion multipliers, I recommend adjusting the model scaling in slicer to fine-tune the fitment.
Among many others, these are the two options I would recommend:
Trial & Error: Print ~1-2cm of the nozzle's receiving end, stop the print early and test the fitment.
→ If the fitment is too tight, you can slightly adjust the fitment by scaling only the X and Y scale in the slicer. The Z scale is quite close to the maximum so probably best to not touch that one and just scale the X and Y scales. Please note that the taper does close by a few tenths of a millimeter, so the first 1cm should be an easy press fit, the taper will make sure everything gets tightened up when fully inserted. This way you can get the fitment you want.
Systematic way: I have now also added a calibration plate to the print profiles, which you can print out. It has 100%, 101%, 102%, 103% and 105% scaled models. You can print the plate and test the different scaling options. The selected scaling options should get you quite close as the 105% scale is already with a ∅36,75mm nomimal ID. Please note, that the taper does make the fitment slightly tighter on the full print.
→ After finding the correct scaling, you can input the desired scaling into the actual model you are printing. You can refer to the numbers in the calibration rings as the required scaling percentage.

Scale [S] → Set “Uniform scale” to “off” → Scale X + Scale Y → Enter

Boost Me (for free)
If you like the model, I would really appreciate receiving a boost. Thank you!
License
You shall not share, sub-license, sell, rent, host, transfer, or distribute in any way the digital or 3D printed versions of this object, nor any other derivative work of this object in its digital or physical format (including - but not limited to - remixes of this object, and hosting on other digital platforms). The objects may not be used without permission in any way whatsoever in which you charge money, or collect fees.
Comment & Rating (7)